Showing posts with label DIY. Show all posts

Monday, August 24, 2015

Curb Appeal : A New [Craigslisted] Front Door

Living in a historic neighborhood, I am constantly reminded of how much character a front door adds to your home. And then I pull up to our house. Waa-waaa
Ok...this is an old picture, like 2 years old, and the fact that my plants aren't in full swing does make a HUGE difference. (Plants are everything!) But it also allows you to focus on the bad. The door and the small sconce.
We never did like our this door. Just another touch of boring from the builders. It was dark brown when we moved in. Dark brown with an army green house...what were they thinking? Black paint was applied, which was an improvement, but we still knew we would change it one day.
I guess it's not the style I dislike so much. This door could be fine on other houses. For example, my parents have it on theirs, and they have a matching palladium window in front with rounded shutters. It looks cute. But on our house it looks generic, especially when driving around our neighborhood and seeing all the gorgeous old doors.
I saw this on CL and although it has the same shape window [as our current door] at the top, it has SOOOOO much more character. Solid wood, stained glass, brass knocker and kickplate and the aged bronze handle. I think they were asking $100! Of course I would have painted it, and I could do without that middle carving detail, but I think it would've added a lot to our curb appeal. It had character! It's not cookie cutter.
I really like a door with windows to bring in as much light as possible. I was inspired by this one (above) that I saw at The Painted House and what do you know? Not too long after seeing it, this one popped up on CL for $90.
Of course I knew immediately that this could be the perfect door...if we could cut those wood panels out. Ernesto had mentioned that our accountant had done this to his door, so he called to ask him directions. His response was "bring it over, I have all the tools and will help you do it." Yes!
So one Thursday they got to work. Here is a mid process pic after using a router to cut out the panels.
And with all 6 panels out....
A heavy duty sander took the gray paint right off and a day later, we had a clean door ready for glass and paint/stain.
At this point Ernesto put the new door up to make sure it fit correctly in the existing frame. A little sanding was needed in a few spots, but otherwise an easy fit. I was so excited by the amount of light coming into our living room.
Our dilemma then was color. The inside we decided to leave wood, but we had to pick a stain.
I thought we should get a walnut stain. In my mind walnut is the color of midcentury dressers that I love, like this Broyhill Brasilia dresser.
I WILL have this beauty in the future, by the way. I'm on a serious hunt! (Mom, if you ever see this while you are thrifting, please don't hesitate to get it for me!)
Anywho, I bought a "light walnut" stain by Varathane and it was way to red for my liking. Shown here on the right.
Ernesto brought home a mahogany (shown on left), which, when put against this walnut, I liked much better. With that being said, I was not so sure once I saw a coat applied liberally with a brush.
It was DARK! The color is nice, but much darker than I wanted.
I was scared to tell Ernesto that we may need to try a different stain. He has put in a lot of time on this door. BUT he said the same thing...too dark! He sanded it down pretty easily and I headed to Lowes and brought home this "special walnut" stain.
BINGO! This stain had that mcm color I was looking for. As most of you know, I am still new to introducing wood into my home, and there aren't a lot of colors that I'm crazy about at this point.
We applied 2 coats of the stain -this time using a cloth (instead of the brush)- we were able to control the color a little more this way. Ernesto finished this side up with two coats of a satin finish poly and it was good to go.
We decided to paint the outside of the door, so we can pick and switch colors as much as we like. We are planning to paint the exterior of our house, if not this fall, for sure in the spring. In the mean time though, we needed to pick a color for the door that looks nice with the army green color of the house.
Color options for the exterior is a whole other blog post. It's going to be a tough decision because I like light and dark. White is in our top 3 choices, but I have had this picture saved for a while. It looks so fresh and pretty. 

There are several other gray houses on our street though, so I may have to save this color scheme for our [future] beach house.  I do like the look of the Ben Moore Paint on the door called Robin's Nest, however, it is more on the blue side than mint. On the BM website though, it does read green, right?
Oh well,  it was a little more saturated than I wanted anyway. One more sample I picked (but can't remember the name) was light enough, but still on the blue side. A few days later, I picked up a sample of Behr's Jade Mist and this one seemed like the right shade. (Very close to the color my dresser at the front door entry)
Here are the three colors painted on a canvas. It isn't a huge difference, but can you see how the top [front] color is the more minty color and the others blue?
I bought a quart of Behr's exterior semi-gloss (paint + primer in one) in Jade Mist and Ernesto applied 2 coats with a roller.
Whew! Next was the glass and hardware. We were referred to Dixie Glass Hoppers in Decatur, and they were super nice and helpful. They had many many glass designs, however all of them cannot be tempered, which is what is needed for a door [so it won't shatter]. Ernesto wanted to go with clear glass, but I thought something that could blur the view a bit would be good, because I do not want a curtain or shade on the door.
We agreed on something that had a little blur, but when it came in [bigger sheets] I wasn't loving it. I didn't remember it looking like this. It reminded me of a patio table top.
Dixie Glass Hoppers said they wanted us to love our glass, so if we didn't like it we could bring it back. (not normally their policy) We decided to give it a try before reordering, and it looks much betting IN the door.
I think we are going to keep it. Once in the door and with light shining through it, it doesn't seem so 'patio table' anymore. Unfortunately, one of the six glass panels was not exactly the correct size and wouldn't fit. Ernesto even sanded the door a little with hopes of squeezing it in. Of course, glass doesn't really squeeze and the piece shattered.
So! Needless to say, we aren't ready to reveal the "before and after" pics yet.  Plus, there are still a few other details.
I am pretty set on this brass handle from Lowes and we will be attaching the brass kick plate back in place.
We aren't stopping with the front door. (curb appeal!) New house numbers, a new (but probably vintage) doorbell, and Im really loving this light fixture (above), but may continue searching for a more economical version. (Sorry RH, I will eventually need three of those lights!)
This awesome cement/gold planter from Target will be hung on the right, above the doorbell.
I also need to majorly trim my garden down for some curb appeal. I usually give up gardening once it hits 90, and it has been for the last couple months, so needless to say, my beautiful garden is not looking its best.
Stay tuned for the final pics coming once our new glass order comes in!!


Friday, September 12, 2014

DIY Toddler Teepee


My friend Lucy sent me this teepee project on Pinterest and said "Let's do it!"
Amazingly, we set a date a couple weeks ago and...guess what? We did it!  I wish I could have a partner for every project I want to get done.  I seem so much more productive with partners. 


I won't be showing step by step photos for this DIY because  The DIY Mommy did a wonderful job in laying out each step with pictures.

If you have been wanting a teepee and not wanting to pay Land of Nod prices,  I say give this DIY a try!  Even if you aren't the best seamstress, it can easily be completed in an afternoon.  Even if you are pregnant, you can do it.  Just take a look at Lucy!


You just have to sew about 20 straight lines and you are done!

 The teepee was was made out of a drop cloth from Home Depot ($20) and some cotton fabric that I had laying around. (free!)  Lucy chose her fabric from my stash too.  I was glad to see it put to use.

**one drop cloth is enough to make two teepees-thanks for buying Lucy! 

 FYI:  I was not able to find round poles/dowels 6' long, so I bought 3/4"square and had them cut 4 of them to 6' right in the store.  ($20)  Round would have been easier to slip through the slots, but luckily my sewing was pretty straight, so I didn't have much trouble. 


I did do my own thing and add some fabric fringe at the top.  The origianl diy sewed on a circle of the coordinating fabric, which was very cute, but I think my embellishment is more teepee-like.  Right?
I cut fabric into long strips and tied them in knots across another strip of fabric that was long enough to wrap around the top. Easy.

Marcelo is modeling/playing here while Mateo was napping.  I thought I would use this teepee as a "house of presents" on his birthday morning.  Coming up in just 10 short days!  Wha what?  Mateo will be three?  Im going to have a 3 year old??  I don't want him to see it before then.  He is going to be so excited!  Priceless.

Have you guys tried and EASY DIY's lately?

Tuesday, March 25, 2014

Happy Spring and an Easter Egg Tree!

Did you guys ever make one of these when you were growing up? My mom (and grandma!) always had Eater egg trees when I was growing up.   It says 'Spring is here' and just makes me happy every time I walk in the house. 

Want to make one too?  It couldn't be easier.

The first step is to blow out the eggs.  I used a small finishing nail and steadily made a little hole.   I moved the nail to peel back tiny pieces just to make the hole big enough to accommodate a small branch.  (Which I clipped from my neighbors tree!)
 Blow. If you make the hole about the size I did, you won't have to blow too hard.  But blow.
 Rinse out the egg and let it dry.  Repeat.  I made a fritatta one morning (with 12 eggs) and invited our neighbors over, but you could start early and save them over time.
This little guy was excited to help, but I hard-boiled 9 eggs for him color.

Notice one egg is missing.  Yes, that was crunched by little hands before I could even get it on the tree.

Anyhoo.  My colors turned out gorgeous, right?  I used the PAAS kit from the grocery, but you could easily make your own colors with food coloring.  I left the deepest turquoise egg in the dye overnight just to get a more saturated color.  It worked! 
Find a sturdy branch with lots of off shoots, place in a vase that won't topple (obvs) and arrange the eggs to your liking.  
Lesson learned:  Move it off the kitchen table to a place up high.  Trust me, I have already done the research for you. Kids and hollow eggs don't mix. Two down, 16 to go.
Hence the new location on the mantel.  Now let's see if we can keep this together until Easter!


Done!  Wasn't that easy?

Ok, blurry phone pic coming up, but it's just too darn cute to not share.
This was taken in Target.  Have you seen all their cute easter decor/baskets?  Im loving everything and was not even able to pick out easter baskets because there were too  many cute ones.  Oh well, I have time.  Do you guys go all out for Easter?  I want to and Target makes it easy to go overboard. I mean that in every way, not only for Holiday decor.  Seriously, do you ever get out of there for under $50?
I don't. Ever.


We just entered Spring officially!
Although we did get into the low 30's the last couple nights, I would say Spring is here.  Atlanta is blooming all around.  
This Carolina Jasmine is going crazy up my front railing. It's so pretty! 
I have a lot more to show you in my garden too (in a separate post).  This is my favorite time of the year. Everything is popping up and healthy! I am passionate about gardening until mid June when it gets too hot. I will have to enjoy these next couple months while I can!

Another sign it's Spring?  Homegoods and TJMaxx have the heavy garden pots in stock again!  Welcome my two latest purchases (on the left)!  The tall turquoise and cobalt pots were $20 each, and the same great quality as all my others (made in Vietnam).  They have proven, even with that cold ass winter we just had, that they are the real deal- no cracking! 

I wonder if I will ever be able to stop buying them?  I think not.  As my sister would say "how could I not buy it?"  Of course that is usually said about cheap thrifted black shirts (her addiction) but that is what goes through my head when I see these gorgeous pots.  The current count is 28, but I think I can fit more on our extra wide staircase. As long as there is enough room for you to get up to the house, right?

What are you guys loving about Spring (in the south)?

Thursday, February 06, 2014

Wallpaper or Stencil? A Tale of an Unfinished Project and New Inspiration!

I had been dreaming of wallpaper for a while, so when we moved into our house two years ago I seriously started looking at my options.  There were plenty. If you have opened a design magazine or blog recently, then you know how awesome the designs are these days.  One of my favorites was this trellis design.  There are "discount" versions which seem like a steal compared to the original Kelly Wearstler wallpaper that retails for $187 (for a single roll?!) 

But just look at it in a small bathroom! LOVE! 
Still, when I priced out my small powder room with the more "inexpensive" papers, it still rang in around $300, which I couldn't justify back then knowing that I had a whole "builder beige" house to decorate from scratch.

Enter the DIY stencil!

My friend Amanda had just bought a stencil at Hobby Lobby for $16 and said that I was welcome to borrow it. 

I loved the design and thought it would be a great alternative to wallpaper.  So within a couple days, we got started. 

First, I painted the whole bathroom "lamb" by Martha Stewart.  I had been holding her "Plumage" swatch for a while, knowing I wanted to use it somewhere.  It is a blend of navy and teal I would say, and very very rich! 

Im not going to sugar coat this.....it was a HUGE pain in the a$$.  

I lost my steam many times, and I almost talked myself into stenciling just a feature wall.  There are six corners in my little bathroom and it was so frustrating to get the stencil in them without slanting.  I had to paint over the blue a couple times with the white and start over. UGH!
The thing that takes so long when you get started is that you have to wait for the square you just painted to dry before starting another.  I sped it up with a hair dryer...worked like a charm.
After each square is painted you line up the little triangle markers in the corners to make sure you are going straight.
This is how far I got on day one after several hours.  Yes, that is all. 
This post isn't going to end how you thought. There will not be a finished room to share. 

I worked on it a couple other times and just couldn't get a lot done at once.  Although I loved the way the stencil looked, I got annoyed with the whole project and dreaded the thought of pulling everything out and working on it again.

So I didn't.  I was able to convince myself that every wall doesn't need to be stenciled.

 Fast forward TWO YEARS and the stupid walls are still not finished.  Im used to it, but not satisfied. I have said many many many times that I would finish it.  Ok Cindy, just finish the one wall opposite the toilet where the mirror hangs.  At least then I would look intentional that I left the two entrance walls white. But no!


The reason I am finally sharing this project (and old-never finished post) with you is because I am going to change it.  To wallpaper.  Yes, a full circle.  What seemed like a lot of money to spend on this small powder room two years ago, now seems like...A finished bathroom!!  So worth it.  Plus I am kinda over the trellis design.

My inspiration?  This wet bar redo by Ally.  Here is the before and after.


Crazy right?   It was nice before too, but this is now WOW! So bold!  And so doable in a small space. Check out more of her before and after pictures on her blog From the Right Bank.

Guys, this is vinyl wallpaper from Lowes. Isn't it awesome?!  And look at the color choices!


The price is right too.  Only $45 for a double roll. (Does that mean 2 rolls?  How many will I need for my bathroom? Mom? )
This is what the website says
Wallpaper Width (Inches)20.5
Type of RollDouble
Roll Size (Sq. Feet)56.0
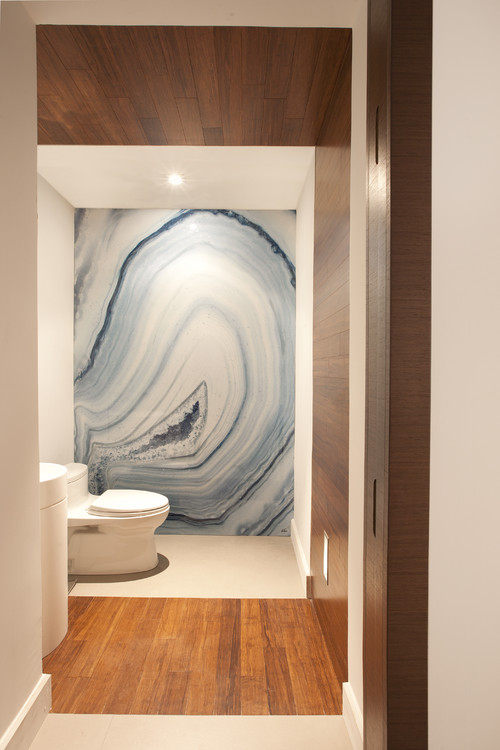
After seeing Ally's wetbar, I was reminded of all the cool "gem/mineral walls" I had seen/pinned on Pinterest. I am inspired all over again.

Ok that one is a real agate slab and would be 5 million dollars (real figure!) but how about this one which is hand painted?


Or this one (from LONNY) that is actually sheets of marbled paper. So beautiful!
{via LONNY}


This Malachite wall is crazy gorgeous.


Anyway, the bottom line is that I am never going to finish that stencil.  It's time for a new plan and there are so many good wallpaper options...Now to choose THE one!

LinkWithin

Related Posts with Thumbnails